If you have dedicated servers at OVH and are wondering how to configure FTP backup space access, you've come to the right place! You might have noticed that this information is available in many languages but not English, and is not all that clear either. While you can just ask OVH support and they will invariably respond reasonably quickly (kudos for that!), it's still a few hours' wait, so I thought I'll write it up to save others the wait.
Access control
Access to the FTP backup space is controlled from the OVH management panel, and is per-IP. Each IP gets all-or-nothing access over one of three methods: FTP, CIFS and NFS. So, before using any of the methods below, ensure you have enabled the relevant IP to access the backup space:
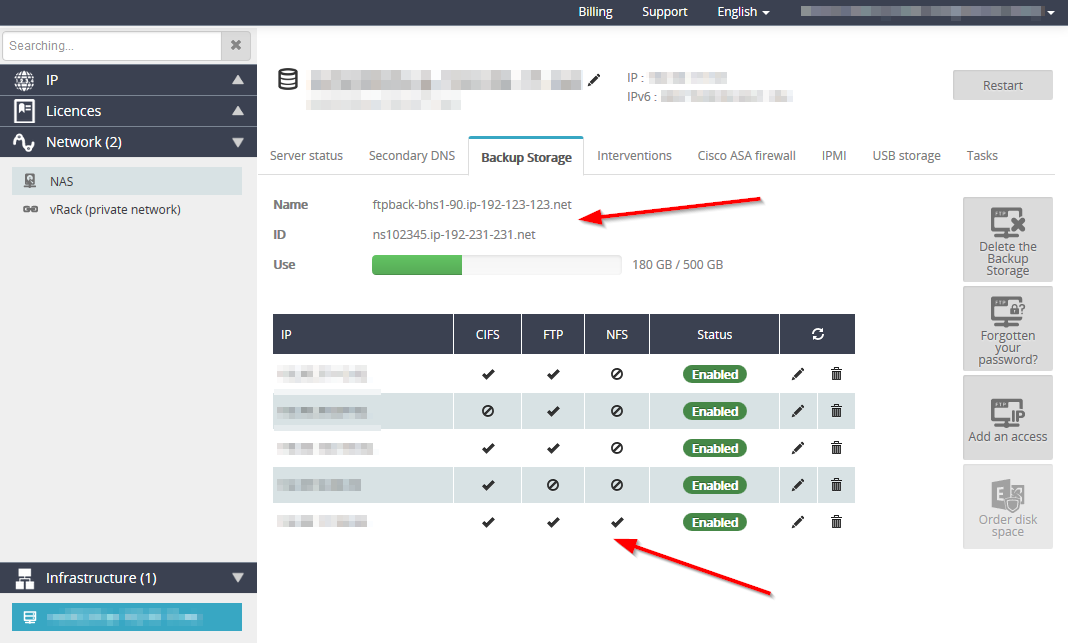
Make a note of the two values near the top of the page, Name and ID. These values are used to construct the commands below.
Browse directly via CIFS
If you enable CIFS, Windows will be able to access the backup space directly via the UNC path comprising the Name + ID. Using the example values from my screenshot, the address would be:
that is,
No passwords of any sort are required.
Warning: in my experience, writing files larger than 32 GB results in silent corruption: the file comes out consisting entirely of zero bytes. Use NFS or FTP for files this large. At the very least, test whether the same thing happens in your setup too; maybe it's just me.
Map network drive
Do the same as for browsing directly via CIFS, and use the UNC path to map the network drive. Again, no passwords are required.
If you have UAC enabled, your best bet is to map it twice: once as a normal user, and once from cmd.exe running as administrator:
Warning: the same file size warning applies as above – seriously, watch out for this. Good thing I decided to test my backups before I needed them!
NFS
NFS access is slightly harder to set up because Windows Server doesn't include the required tool in the default installation. The upside is that files larger than 32 GB work fine in my experience. Make sure NFS is enabled in the OVH Manager for the IP it's accessed from.
The tool required for mounting an NFS share is called just mount. Try running mount on the command line. If you're told there's no such command, run "Programs and Features", select "Turn Windows features on or off", and then go to the relevant section below:
Windows Server 2012 R2
You will see Server Manager start, launching a wizard. Click Next a few times, until you get to Features. Find "Client for NFS". Tick the checkbox. Click Install.
Windows Server 2008 R2
The Server Manager will start, but this time without a wizard. Just select "Roles" in the left pane, then "Add Roles" on the right. Select the "File Services" role and proceed to "Role Services". Deselect "File Server" (unless you need it for other things) and select "Services for Network File System". Finish the installation.
Mount the drive
To mount it with the mount command, you'd run something like this:
However, at least in my setup, there were lots of issues with this. The mapped drive wasn't accessible after a reboot, and it wasn't possible to delete and remap it either. So I don't recommend using the mount command.
The best way I've found is to create a Scheduled Task, set it to run as the NT AUTHORITY\SYSTEM user, and run the following net use command:
This maps the B: drive for all contexts, that is all users and all elevation states if you use UAC. /persistent:no ensures that the command will succeed on the next reboot even if net use was configured to make all mappings persistent.
FTP
I don't like this method very much, but since it's in the title, and for completeness, here goes. The parameters you need are:
- FTP server:
<Name>, something likeftpback-bhs1-90.ip-192-123-123.net - Username:
<ID>, something likens102345.ip-192-231-231.net - Password: this, unfortunately, is only available via the initial FTP backup activation email
If you've lost your activation email, I'm not aware of any options other than to ask OVH Support to tell you your FTP password.